Thursday, July 19, 2012

Scribbler Too

Jack Skellington

Have you seen this way cool, really fun app called Scribbler? Somehow I missed that boat, but thanks to one of my favorite crafty bloggers Regina at Creative Kismet  that has been rectified. It's not just Scribbler though, now there is a Scribbler Too. And OH-MY-GOSH, if I didn't have work to do, house to clean, kid to look after and dinner to make I might not stop playing with it! If you have a minute or 40 to spare go play!

Hi Mickey!

I love the imperfect perfection of it! You only get one undo at a time so you just have go with it. It's refreshing to let go and not have to be so precise. It still looks amazing. I  love the darkness of lines and of course that's a perfect excuse to doodle my favorite skinny guy, Jack Skellington. Fun, fun, fun I tell you!


The Pumpkin King


Faithful Friend - Zero


Thursday, June 21, 2012

A Little Magic at Our Back Door at the New Disney Store Park Meadows

Have you heard? Park Meadows has a new Disney Store! And it's AMAZING!

The New Disney Store at Park Meadows

I actually worked at the Park Meadows Disney store in 2001-2002 as part of the team that converted the store to a "Disney PLAY" Store. It was one of a set of concept stores that were being tested and it was FUN! The store was turned into a magical place where kids could come for story time, dress up, color and play games.

That concept has clearly evolved! Folks were all a buzz in 2010 when Disney unveiled the first new interactive store design set and now we have a bit of that magic right here in Colorado at the Park Meadows Disney Store.

The new interactive Disney Stores incorporate some of what I love from being at a Disney park. The store is clean and streamlined and there are little hidden gems located throughout the store. Even the "box office" has a fun "queue". Just like being on a ride at Disney they keep you happy in line by giving you lots to look at and making the journey along the path entertaining.


Magical "Box Office" with Disney Parks like queue

What Disney does best, gives you a perfect show! 
Super fun Plush Mountain

The new stores aim to deliver the "best 30 minutes of a child's day" and I think they've totally hit the mark!

Unlock Imagination - Each morning at the new Disney Store a child is chosen to participate in the opening ceremony to "Unlock Imagination" with an over sized key in a special "lock" that really "clicks" when it's turned. The child will also receive a keepsake key to take with them for being a part of the ceremony. I wonder if they'd ever consider picking an adult? I wanna open the store one day!!! I'm really a kid at heart right?

"Unlock Imagination"  every day at the new Disney Store
The sweet family that got to participate in the "Unlocking" ceremony on  Grand Opening Day

Pixie Dust Trail - As you walk into the store you travel along a fun, sparkly, blue trail that leads you throughout the store. You know that magical things are in store as you walk along the path. Storytelling "neighborhoods" are on either side of the path.

Pixie Dust Trail

Princess Neighborhood: Disney Princess Castle with Magic Mirror - Little Princesses can walk right through the Castle to a little Magic Mirror garden. Wave any wand (or other costume accessories) in front of the mirror and that Princess will appear in the mirror. All of the favorites are there (Belle - my fav, Cinderella, Ariel, Sleeping Beauty, Snow White and Tiana) and each will tell you a little about their story.


Disney-Pixar CARS and Toy Story Neighborhood - This is the part I love! Don't get me wrong, I love the Princesses, but I have long thought that boys get the short end of the stick when it comes to product selection. The boys have a huge representation in this over sized car toys case - imagine you are a toy, again reminiscent of Disney Parks magic... think "A Bugs Land" and "Honey I Shrunk the Kids"! With the acquisition of the Marvel characters and the Disney-Pixar assets the boys have lots of great items to choose from! I was sad to hear that this Disney Store won't have a Ridemakerz area though.


Magical Trees - This is a really fun part of the new interactive store, Magical Trees! Watch the trees from visit to visit, you will continue to see new things. The trees leaves will coincide with the time of year and will also show familiar characters and clips from the movies. Watch for the trees to help set the mood for some of the magical ceremonies in the store with fireworks. And one more fun thing, for us Disney fans, is to search for the Hidden Mickeys! There are some hidden in the trees, can you find them?

Happy Spring Trees

Custom Skyline - The stores used to have 3D characters hanging from the rafters depicting magical moments of Disney films. Each store was different and it was always fun to check out what each store had. The 3D characters are gone but now there is new magic to enjoy along the skyline. Take a look around, there are still characters and landmarks from our favorite films depicted throughout the landscape along with local landmarks. The skyline's light and color changes and may match what's happening with the magical trees, time of day or ceremonial happenings!


Disney Store Theater - This may be the piece de resistance! The theater contains a "video library" that guests get to operate. There are Disney film trailers, movie clips, music videos, classic animation and more, all to watch on a 12 foot screen! With over 50 selections to choose from you certainly won't get bored! And you may be here for a while because this center is so much more that video watching. Kids can sit and color while they watch the screen and this gazebo is also the "community center" where the store will host activities such as drawing workshops, storytelling experiences, trivia events and more! Check the screen outside the store to inform you of upcoming events.


I had the awesome opportunity to get a sneak peek of the store the day before it opened and then of course I just had to go for the Grand Opening celebration. Mickey and Minnie were there and the first 500 Guests got a little goody. It was a crazy busy morning and everyone had a great time. If you get a chance to check out the new Disney Store in Park Meadows I highly recommend it! And be sure to check back at the store or online for their upcoming events.

Mickey gave me a little wave!


Thank you Disney Store Park Meadows for hosting us and for the wonderful goody bag my son and I received!  Even the sneak peek was magical! 


Friday, September 30, 2011

Lunchbox Awesome

Lunch. More specifically bentos. It's the last thing on my mind at night as I ponder what I have in my fridge and sketch the following days design. It's the first thing on my mind when my alarm goes off at 5:45...  and a groggy "Time to make the bento" plays in my head like the old Dunkin Donuts commercial.

I decided during this past summer that I wanted to make a fun bento every day for my kiddo's lunches this school year. I dug around online for a bit to see ideas and found some very fun sites that have recipes and tutorials for how to manipulate food into shapes and patterns that you don't envision initially when you think about it.

Day one I put together a cute, generic style, bento. I knew immediately that I wanted to do Disney characters and other fun imagery. But little did I know, that crazy idea I had during the summer, would be received so warmly with my Facebook friends. I started posting them daily there and got so many requests for a place to see them all at once. A book, a blog... a tumblelog.

One day a book may be in order. But for now they can all bee seen in one place at lunchboxawesome.tumblr.com.


Goofy, I know. But this morning ritual has become an important part of my day. I love trying to figure out how I can use different food to make a fun piece of edible art. I am creative every day, I'm a designer by day and all around artsy-crafty gal at night but now I get to start every day being creative right off the bat... it's invigorating.

I'd love for you to visit Lunchbox Awesome and try a few yourself! Come back and link your creations in the comments if you do! Bon appetite!

Wednesday, September 7, 2011

Life Saving Sanity Tip #41

One thing I can't stand is a stinky trash can. Indoors is bad enough, but the big curbside trash can that sits in the garage all week, festering with rotten who-knows-what. Our trash pick up is Friday morning, and wouldn't you know I planned salmon for dinner friday night. Now we get to smell that funk all week. Well not anymore. Thanks to my Life Saving Sanity Tip #41. (I'm not sure what the 40 are before it... and I am not sure it's really life saving, but I have found it to be quite helpful!)

Anyway, Tip #41 is this: Keep a bag, either the ziplock you pulled the stinky causing carcass out of, or a grocery bag in the freezer that you can keep all of the weeks remains. Set an alarm on your smart phone to go off after dinner on the night before your trash comes (especially if you are the type to go racing out to meet the garbage man in your underwear first thing in the morning). 

Now you have a weekly reminder to get the bag out of the freezer and put in the garbage and it doesn't have a chance to simmer outside. It might be a good time to go through the rest of the fridge and freezer and throw out other questionable foodstuffs too.

There you go!  I hope you will embrace the sanity that comes from this helpful tip! =)


Thursday, June 9, 2011

Chalk Art and Big Dreams

I had a few big goals lined up for 2011. The first one was to participate in the Sketchbook Project. It was a lofty goal to do something completely different from my norm. However, it was too far from my norm and I stood like a deer in headlights at the pristine, little book. Alas, it still sits on my shelf, untouched, except for the place I entered my name, and mocks me every day that it did not get to go on the grand tour with all the other lovingly embellished books. Perhaps in time I'll find the courage and inspiration to make it up to the little book.

Goal number two was to get into a craft show. I DID it! I'll be exhibiting this fall at the Horseshoe Craft & Flea Market. I am super excited! I'll be making lots of Halloween decorations over the next several months to get ready. There is one more show this summer as well, if you get a chance to check it out, do!


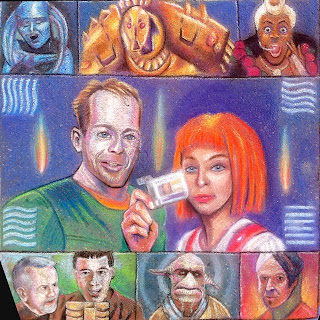
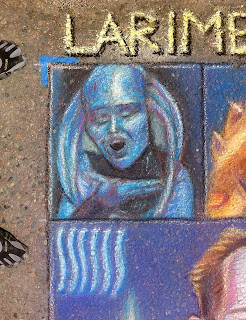
The third goal was to participate the Denver Chalk Art Festival. Two outta three ain't bad, right? =) I had the pleasure of working on a collage of The Fifth Element with one of my very best friends, Steve Oatney (and his beautiful girlfriend Defne). We started talking about how we would like to participate as we were walking around the festival last year. So I put that on the goals list for this year and I am so glad I did. It was so much fun working in an actual art medium, rather than a computer, on my favorite film with my best friend.

The square was one of the smallest, a 6x6'. We had a great location in the shade on Larimer, and even though the pavement we had to work on was less that stellar, it worked out just fine! We didn't win any awards, but it got me all pumped up to do more drawing and illustration. Here are some pics of the finished piece. Enjoy.


Thursday, April 21, 2011

Bunny Digi Stamp

I'm not sure what's happened this week, but I've been pretty inspired with Easter crafts! I've got one more goody for you - a digital stamp to use to create your own cards or decorations.

He's so cute... I see lots of opportunities for him in the future. In the meantime I hope you have fun with him. Please say "hi" if you download and be sure to come back and post a link to the creations you make!


Click the image to open in new tab for larger image. Then right click to download.

For personal use only.
© heather sitarzewski

Tuesday, April 19, 2011

Felt Cookies Revisited - Easter Egg Cookies

Several months ago I received a sweet email asking about my felt cookie tutorial and if I would be interested in having my post linked to on her site. That email came from Callye Alvarado of the Sweet Adventures of SugarBelle. She makes the most unbelievably gorgeous cookies - real edible ones - unlike the playthings I have concocted!. I was so blown away by her site that I scoured through it for hours and visit it almost on a a daily basis, because she has new posts almost every day. I'm completely obsessed with her creations and crazy envious of her skill! Check her out!

This post is per her request for a more in-depth tutorial for the the felt cookies and since Easter is a few days away she asked for an Easter themed set. You could apply the same steps for almost any holiday or occasion and make a completely custom set of cookies!

Without further ado!


You'll need:
Egg shaped cookie cutter (or you could use a round cutter and gently reshape it)
2 12X9" pieces of creme colored felt (for dough)
1 12x9"piece of tan felt (for baked cookies)
felt and ric-rac for decorative "icing" (your choice of colors, can use scraps)
buttons & beads for more elaborately decorated eggs (optional)
matching embroidery floss for dough and baked cookies
fabric glue
scissors
needle
polyfil (or stuffing)

DOUGH:


Pin the two sheets of creme felt together and trim around the edges to round corners and make random curves. (like you've rolled out the dough). Stay fairly close to the edges so you have plenty of room for four cookie cutouts. These measurements could be altered to make more or less cookies, I think four make a nice set.


Use the cookie cutter as a template and mash into the "dough" to give you an impression to cut by. Carefully cut out 4 sets of cookies from the "dough", make sure to cut through both layers.


Sew each set of cookie cutouts and the surrounding dough together using a blanket stitch with matching embroidery floss.

BAKED COOKIES:


Use the cookie cutter to make a template on a scrap of lightweight cardboard (raid your recycle bin for a cereal box). Trace the cutter and add about 1/8 to 1/4" extra all around. Cookies expand when they cook you know!

Using template cut out four sets of "cooked cookies" from the darker felt.

Now comes the really fun part - decorating the cookies! =) Use scraps of felt, ric-rac, buttons, beads - you name it and layout designs on your cookie. I used a yellow scrap of felt and two sizes/colors of ric-rac for simplicity. Think about how you like to decorate real eggs and be creative... you could even use felt "icing" all over the top of the cookies like I did with the heart cookies. Or use a completely different color of felt for the entire cookie itself - like a dyed egg!


Use fabric glue or tacky glue to adhere the pieces (or sew them if you use buttons, etc.)


Place on back of cookie and sew together (again with a blanket stitch) with matching floss leaving an opening to stuff. Do not overfill cookie, continue sewing shut.


Voila! Place in an Easter basket with a rolling pin and get ready to whip up some deliciously fun Easter "treats" with the little ones!

Thank you Callye!